
PI 3 Splicing
Step 1 Untwist the individual strands of rope back 12″ (30cm) from the end of the rope.
![]()
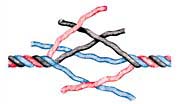
[separator style_type=”single” top_margin=”20″ bottom_margin=”20″] Step 2 “Marry” the six strands, staggering the strands from each end as shown, being careful NOT to match colors (DO NOT PUT RED WITH RED etc.). Leave approximately 1″ (2.5 cm) space between twisted ends.
[separator style_type=”single” top_margin=”20″ bottom_margin=”20″] Step 3 When working to the left, the first strand is wrapped towards you, around and under the opposite strand, keeping the lay of the rope as near as possible to that of the strand being wrapped.

[separator style_type=”single” top_margin=”20″ bottom_margin=”20″] Step 4 Repeat with the second strand and its opposite, and the third strand and its opposite. Only ONE wrap should be made on each strand at one time.
[separator style_type=”single” top_margin=”20″ bottom_margin=”20″] Step 5 When working to the right, wrap the strands away from you, around and under their opposite strands.

[separator style_type=”single” top_margin=”20″ bottom_margin=”20″] Step 6 Follow this procedure for six wraps, three to the left and three to the right, giving a light, even pull on each end after each wrap is completed.
[separator style_type=”single” top_margin=”20″ bottom_margin=”20″] Step 7 Remove approximately half of the ends from each strand and continue the procedure for three additional wraps to the left and three to the right. This will taper the splice and is highly recommended.

[separator style_type=”single” top_margin=”20″ bottom_margin=”20″] Step 8 Cut off all strand ends leaving tails of 3/4″” – 1″ (1.9 – 2.5cm) long.
[button link=”https://williamkenyon.com/wp-content/uploads/2014/08/Pl3Splicing.pdf” color=”default” shape=”round” target=”_blank”]Download Brochure[/button]